Are you ready to take your BeamNG.drive vehicle customization to the next level? Adding Custom Car Parts is a fantastic way to personalize your ride and enhance your driving experience. This comprehensive guide will walk you through the process of integrating your own custom car part into BeamNG.drive, making your creations come to life in the game. Whether you’re crafting a unique front bumper, spoiler, or any other auto part, this tutorial provides a clear, step-by-step approach to get you started with vehicle modding and custom car part implementation.
Tools You’ll Need for Creating Custom Car Parts
Before diving into the process of adding your custom car part, ensure you have the necessary tools ready. These are essential for both creating and integrating your part into BeamNG.drive:
- Notepad (or any text editor): For editing Jbeam files, which define the properties and behavior of your car part within the game.
- Blender: A powerful, free 3D modeling software used to create and modify your custom car part model.
Step 1: Setting Up Your Mod Folder for Custom Parts
To begin adding your custom car part, you need to establish a dedicated mod folder. This keeps your custom content organized and easily accessible by BeamNG.drive.
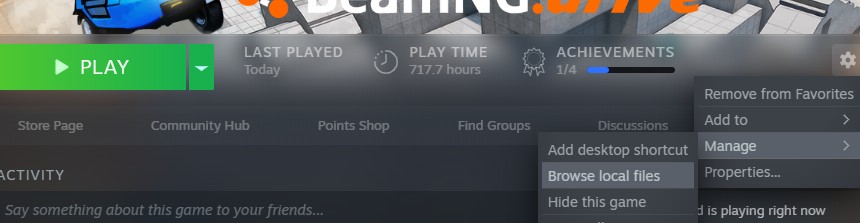
-
Accessing Game Files via Steam: Start by locating your BeamNG.drive game files through Steam. Right-click on “BeamNG.drive” in your Steam library, navigate to “Manage,” and select “Browse local files.” This will open the root directory of your game installation.
-
Navigating to the ‘vehicles’ Folder: Once in the game files, find and enter the “vehicles” folder. This directory contains all the base game vehicle files, which will be useful for referencing existing part structures.
alt text: File explorer view inside BeamNG.drive game files, highlighting the ‘vehicles’ folder.
-
Opening the User Folder: Launch the BeamNG.drive launcher. Click on “Manage User Folder” and then “Open in Explorer.” This will open your user folder, where your mods and customizations are stored separately from the core game files.
alt text: BeamNG.drive launcher interface with ‘Manage User Folder’ button highlighted.
-
Creating ‘unpacked’ Folder (If Necessary): Inside your user folder, navigate to the “mods” folder. If you don’t see an “unpacked” folder, create one. This is where we’ll place our custom car part mod for development.
alt text: File explorer showing the ‘mods’ folder, with an instruction to create ‘unpacked’ folder.
-
Creating Your Mod Folder: Within the “unpacked” folder, create a new folder. Name this folder descriptively for your mod – for example, “my_custom_sunburst_parts”. This folder will house all the files for your custom car part.
alt text: File explorer showing the ‘unpacked’ folder with a newly created mod folder named ‘my_custom_sunburst_parts’.
-
Creating the ‘vehicles’ Subfolder: Inside your newly created mod folder (e.g., “my_custom_sunburst_parts”), create another folder named “vehicles”. This structure mirrors the game’s file organization and is crucial for BeamNG.drive to recognize your custom car part correctly.
alt text: File explorer showing the custom mod folder with a newly created ‘vehicles’ subfolder inside.
-
Identifying Vehicle Codename: Inside the “vehicles” folder you just created, you need to create a folder with the codename of the vehicle you are modifying. To find this, either check the game files (vehicles > content > vehicles) or search online for the codename. For the Sunburst, the codename is simply “sunburst”. Create a folder named “sunburst” (or the codename of your target vehicle).
alt text: File explorer showing the ‘vehicles’ subfolder with a vehicle codename folder, ‘sunburst’, created inside.
-
Locating Base Game Part File: Navigate back to your game files (via Steam – step 1) and find the zip file for your target vehicle (e.g., “sunburst.zip”). Open this zip file and locate the
.jbeamfile for the part you wish to customize. For a front bumper, it might be named something likesunburst_bumper_f.jbeam.alt text: File explorer showing the contents of sunburst.zip, highlighting ‘sunburst_bumper_f.jbeam’ file.
-
Copying and Renaming the Jbeam File: Make a copy of the base
.jbeamfile you found and paste it into your mod folder, specifically insidemods/unpacked/your_mod_folder/vehicles/vehicle_codename/. Rename this copied file to something unique to differentiate it from the original – for instance,sunburst_bumper_f_custom.jbeam. Using a descriptive name helps in organization and identification later.
Step 2: Preparing Your 3D Model in Blender for BeamNG.drive
With your mod folder structure set up, the next crucial step is preparing your 3D model in Blender to be compatible with BeamNG.drive. This involves proper naming, texturing, and exporting your custom car part.
-
Importing or Creating Your Model: Open Blender and either import your existing custom car part model or create a new one. Ensure your model is well-structured and optimized for game use.
-
Naming Your Model: In Blender, name your 3D model object appropriately. Use a name that is descriptive and easy to remember, ideally reflecting the vehicle and part, such as
sunburst_custom_front_bumper. This name will be referenced in the Jbeam file later. Use the outliner in Blender (usually on the top right) to rename your object by double-clicking on the existing name. -
Texturing Your Model: If your custom car part is a modification of an existing part, you might be able to reuse existing textures. However, for completely new models, you will need to assign materials and textures. For basic texturing, in Blender, navigate to the Material Properties tab. Assign a new material and link it to a texture. For more detailed PBR (Physically Based Rendering) texturing, refer to advanced tutorials. If reusing textures, ensure the material name in Blender matches the material name used in the base game vehicle files (e.g., “sunburst” or “grille”).
-
Exporting as DAE (Collada) File: Once your model is prepared, export it from Blender in the DAE (Collada) format. Navigate to File > Export > Collada (.dae). When exporting, choose a location within your mod folder. You can name the exported file something convenient, like
custom_sunburst_bumper.dae. It’s a good practice to place it directly in your main mod folder (e.g.,mods/unpacked/my_custom_sunburst_parts/). -
Placing the DAE File in Mod Folder: Ensure your exported
.daefile is placed in a logical location within your mod folder. A common practice is to keep it in the root of your mod folder for simplicity.
Step 3: Editing the Jbeam File to Integrate Your Custom Part
The Jbeam file is crucial for defining how your custom car part behaves in BeamNG.drive. Editing this file correctly ensures your part is recognized by the game, attaches to the vehicle properly, and functions as intended.
-
Opening Your Copied Jbeam File: Open the copied and renamed Jbeam file (e.g.,
sunburst_bumper_f_custom.jbeam) from your mod folder using Notepad or your preferred text editor. -
Isolating Your Part’s Jbeam Code: The original Jbeam file might contain code for multiple parts (e.g., different bumper variations, fog lights). To avoid conflicts and ensure only your custom car part is loaded, you should isolate the Jbeam code relevant to your new part. In many cases, you’ll want to remove sections of the Jbeam file that define other parts. Identify the sections for other parts (like fog lights or other bumper styles) and delete them, leaving only the basic structure and the main bumper definition. Sections are typically defined between part names (like
["partName":{) and their closing brackets (},). -
Verifying Jbeam File Endings: After removing unnecessary sections, ensure the Jbeam file ends correctly. The file should typically end with two closing curly braces
}}and closing parenthesis). Double-check that the file structure is intact and not broken due to deletions. -
Editing Key Jbeam Parameters: Now, you need to modify specific lines in the Jbeam code to correctly define your custom car part. There are primarily three key areas to adjust:
-
Part Name (Internal Identifier): At the very top of the Jbeam file, you’ll find a part name definition. This is an internal identifier used by the game. Change this to a unique name for your part. For example, change
"sunburst_bumper_f"to"sunburst_bumper_f_custom". -
Display Name (In-Game Part Selector): Look for the
"name"parameter within theinformationblock. This is the name that will appear in the in-game parts selector. Change this to a user-friendly name for your custom car part, such as"Custom Sport Front Bumper"or"Aggressive Front Bumper". -
Flexbody Name (Linking to 3D Model): Find the
"flexbodies"section. This section links the Jbeam definition to your 3D model. You need to update the"mesh"parameter to match the name of your 3D model object in Blender (which you named in Step 2.2) and the name you used when exporting the DAE file (Step 2.4). For example, if you named your modelsunburst_custom_front_bumperin Blender, update the mesh line to{"mesh":"sunburst_custom_front_bumper", "pos":[0,0,0], "rot":[0,0,0]}. If there are multiple flexbodies listed (like fog lights, as in the original example), and your custom part doesn’t include them, you can either remove those lines or comment them out (by adding//at the beginning of the line). Lines starting with{"deformGroup"are related to glass deformation and can generally be ignored for basic part modifications if you are not working with glass.alt text: Notepad showing the flexbodies section in a Jbeam file, detailing mesh linking and positioning.
-
-
Saving the Jbeam File: After making these essential edits, save the Jbeam file. Ensure you save it in the correct location within your mod folder (
mods/unpacked/your_mod_folder/vehicles/vehicle_codename/) with the renamed filename (e.g.,sunburst_bumper_f_custom.jbeam).
Step 4: Testing Your Custom Car Part In-Game
With your 3D model and Jbeam file prepared and placed in your mod folder, it’s time to test your custom car part in BeamNG.drive.
-
Check Mod Manager: Launch BeamNG.drive and go to the Mod Manager. Verify that your mod appears in the list and is enabled. If it doesn’t appear, try pressing
Ctrl+Lin the Mod Manager to refresh the list. -
Accessing the Parts Selector: Load into a world and spawn the vehicle you are modifying (in this example, the Sunburst). Open the Parts Selector (usually by pressing
Ctrl+WorEscand navigating to “Vehicle” then “Parts Selector”). -
Finding Your Custom Part: In the Parts Selector, navigate to the category where your part should appear (e.g., “Front Bumpers” for a front bumper). Look for your custom car part using the display name you set in the Jbeam file.
-
Selecting and Testing: Select your custom car part to equip it to your vehicle. Check if it loads correctly, is visually as expected, and deforms properly in crashes. If everything works as intended, congratulations, you have successfully added a custom car part to BeamNG.drive!
Conclusion
Adding custom car parts to BeamNG.drive opens up a world of personalization and creativity. By following these steps, you can bring your unique automotive visions into the game. Remember to experiment, iterate on your designs, and share your creations with the BeamNG.drive community. This guide provides a solid foundation for vehicle modding, encouraging you to explore further and master the art of custom car part development.