The humble dipstick, often overlooked in our increasingly digital world, remains a crucial tool for any car owner. This simple metal rod offers a quick, cost-effective snapshot of your engine’s health, primarily through the level and condition of your motor oil. But understanding where oil should be on the dipstick and what variations might indicate is vital for maintaining your vehicle’s longevity and performance. As your trusted auto repair expert from cardiagxpert.com, let’s dive into the essential lessons of reading your oil dipstick like a pro.
Lesson 1: The Art of the Dipstick Retrieval and Read
Checking your oil isn’t just about yanking out the dipstick; it’s a mini-procedure that, when done correctly, provides accurate insights. Here’s your step-by-step guide:
-
Preparation is Key: Ensure your engine is warm but switched off. Park your car on level ground to get a true reading. Allow a few minutes (around 5-10) after turning off the engine for the oil to drain back into the oil pan. This waiting period is crucial for accurate level assessment.
-
Locate and Extract: Pop the hood and find the dipstick. It’s usually identifiable by a brightly colored handle or loop, often labeled with an oil can symbol. If you’re unsure, your owner’s manual is your best friend. Grab a rag or paper towel to keep things clean. Pull the dipstick out completely.
-
The Initial Wipe: The first pull will likely show an oil smear higher than the actual level. Wipe the dipstick clean with your rag or paper towel. This removes the initial oil film for a clear second reading.
-
Re-insert and Read: Push the dipstick back into its tube until it’s fully seated. Wait a couple of seconds, then pull it out again. This second pull is the one you’ll read to determine your oil level.
-
Interpreting the Markings: Examine the end of the dipstick. You’ll see markings – often “MIN” and “MAX”, “LOW” and “FULL”, or a cross-hatched area. Sometimes, there are holes instead of lines. The oil level should ideally be within or at the “MAX”/”FULL” mark.
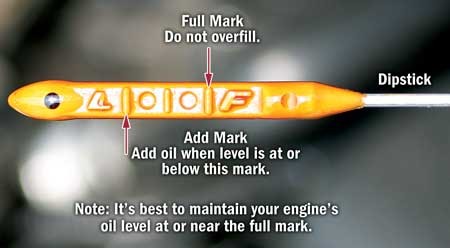 Engine Oil Dipstick Markings
Lesson 2: Decoding a Low Oil Level on Your Dipstick
Where should oil be on the dipstick when it’s low? If the oil level on your dipstick falls below the “MIN” or “LOW” mark, or doesn’t even reach the markings at all, it indicates a low oil level. This is a serious concern that demands immediate attention.
-
Action Required: A low reading means you need to add engine oil. Start by adding about a quart (liter) of the recommended oil type for your vehicle (check your owner’s manual). After adding oil, wait a few minutes, and re-check the dipstick to ensure you’ve reached the correct level – ideally between the minimum and maximum marks, but closer to the maximum is generally better.
-
Understanding Oil Consumption: Some oil consumption is normal, especially in older vehicles or under demanding driving conditions. However, excessive oil consumption is a red flag. As a general guideline, consuming more than one quart of oil every 1,000 miles (approximately 1,600 kilometers) is considered abnormally high and warrants investigation. If you’re losing a quart every 500 miles (800 kilometers), it’s a sign of a significant issue that likely requires professional attention, potentially an engine overhaul.
-
Is Being a Quart Low Okay? While some manufacturers might state it’s acceptable to wait until the oil reaches the “ADD” mark, consider the implications. Most modern passenger cars have relatively small oil capacities, often around four to five quarts. Being a quart low means you’re operating with a significant percentage less oil – potentially 20-25%. This reduced volume diminishes the oil’s ability to perform its vital functions: lubrication, cooling, and contaminant management.
Lesson 3: High Oil Level: When More Isn’t Better
What if the oil level is too high on the dipstick? Finding the oil level significantly above the “MAX” or “FULL” mark is also problematic. This could be due to overfilling during an oil change, but it can also signal more serious issues:
-
Fuel Dilution: Unburnt fuel can sometimes leak into the oil pan, raising the oil level and thinning the oil. This is often accompanied by a noticeable fuel smell on the dipstick. Fuel-diluted oil loses its viscosity and lubricating properties, leading to increased engine wear.
-
Water Contamination: Condensation, especially in engines used for short trips that don’t fully warm up, can introduce water into the oil. In severe cases, coolant leaks can also dramatically increase oil volume. Water and coolant contamination are detrimental to oil performance and can cause corrosion and sludge formation.
-
The “Crackle Test” Caution: A traditional method to check for water contamination is the “crackle test.” Carefully place a drop of oil from the dipstick onto a hot exhaust manifold. If it crackles or sounds like frying bacon, it suggests water presence. However, exercise extreme caution as oil can be flammable. This test is less reliable and potentially dangerous; modern oil analysis methods are much safer and more accurate.
-
Overfilling Consequences: Accidental overfilling during an oil change is a common cause of high oil levels. An excessively high oil level can cause the crankshaft to churn the oil, creating air bubbles and foam. This aerated oil is less effective at lubrication and cooling, potentially leading to oil starvation, overheating, and engine damage. It can also put pressure on seals and gaskets, causing leaks.
-
Rectifying High Oil Levels: If you suspect overfilling, carefully drain a small amount of oil until the level is within the correct range. If you suspect fuel or coolant contamination, it’s crucial to have your vehicle inspected by a professional mechanic immediately.
Lesson 4: Reading the Signs of Aged or Contaminated Oil
The dipstick isn’t just about oil level; it’s also about oil condition. Fresh engine oil should appear relatively clean and translucent. As oil ages and works, it degrades and accumulates contaminants.
-
Visual Inspection: Wipe some oil from the dipstick onto a clean white cloth or paper towel. Observe its appearance:
- Healthy Oil: Should look smooth, glossy, and somewhat translucent with an amber or light brown color, depending on how recently it was changed and the type of oil.
- Aged/Dirty Oil: Dark, opaque, or black oil indicates it’s likely old and needs changing. Sludge or gritty particles suggest significant contamination and overdue oil change.
-
Texture and Smell: Feel the oil between your fingers (wearing gloves is advisable). Healthy oil should feel smooth. Grittiness or excessive thickness is a bad sign. A burnt or acrid smell, or a strong fuel odor, also points to oil degradation or contamination.
-
The Blotter Spot Test (For Deeper Analysis): For a more in-depth DIY assessment of oil condition, consider a blotter spot test. Place a drop of oil on absorbent paper (like coffee filter paper) and observe how it spreads. An ideal result is a uniformly spreading spot. A spot with a dark center and a light outer ring can indicate soot or oxidation. (Refer to online resources for detailed interpretation of blotter spot tests).
-
Interfacial Tension (Advanced Test): While less practical for everyday checks, the concept of interfacial tension is important. Healthy oil beads up on water due to high surface tension. As oil degrades, it loses interfacial tension and spreads out on water. A simple test (less reliable) involves placing a drop of oil on water. If it spreads quickly instead of beading, it may indicate degraded oil.
Image: A close up of a hand holding a dipstick with engine oil on it, inspecting the color and consistency of the oil.
Lesson 5: Spotting Coolant Leaks via the Dipstick
Coolant leaks into the engine oil are a serious issue that can be detected through dipstick analysis.
-
Chocolate Milk Appearance: A telltale sign of coolant contamination is oil that looks like chocolate milk – a milky brown or tan color. This emulsion of oil and coolant is highly detrimental to engine lubrication.
-
Brown Bubbles or Crusty Residue: Look for brown, foamy bubbles or a dried, crusty brown residue around the dipstick, especially above the normal oil level line. This is another strong indicator of coolant in the oil.
-
Sweet Exhaust Smell and White Smoke: Coolant leaks can also lead to white exhaust smoke with a distinctively sweet smell. This is often accompanied by a rising oil level on the dipstick as coolant displaces oil.
-
Drain Plug Inspection (For Confirmation): If you suspect a coolant leak, a more definitive check involves carefully draining a small amount of fluid from the oil drain plug after the engine has been off for a while. Coolant is heavier than oil and will settle at the bottom. Collect a small sample in a clear container. If you see a separate layer of fluid beneath the oil, especially if it’s a milky or mayonnaise-like consistency or has a sweet smell, it confirms coolant contamination.
-
Immediate Action Required: Any indication of coolant in your engine oil necessitates immediate professional diagnosis and repair. Coolant leaks can cause severe engine damage, including bearing failure and head gasket issues.
In Conclusion:
Mastering the art of reading your oil dipstick is a fundamental aspect of vehicle maintenance. By understanding where oil should be on the dipstick, how to interpret oil level variations, and recognize signs of oil degradation or contamination, you can proactively safeguard your engine’s health and longevity. Regular dipstick checks, combined with scheduled oil changes, are your first line of defense in preventing costly engine repairs and ensuring your car runs smoothly for miles to come.