Replacing a car bumper might seem like a daunting task, but with the right approach and a bit of elbow grease, it’s a completely achievable DIY project. My own journey restoring my beloved 1999 Boston Green BMW Z3, affectionately named Zelda, involved just that – tackling a shattered front bumper cover after a minor accident. This experience taught me a lot about sourcing the correct Bumper Part Car owners need and the process of bringing a damaged bumper back to life.
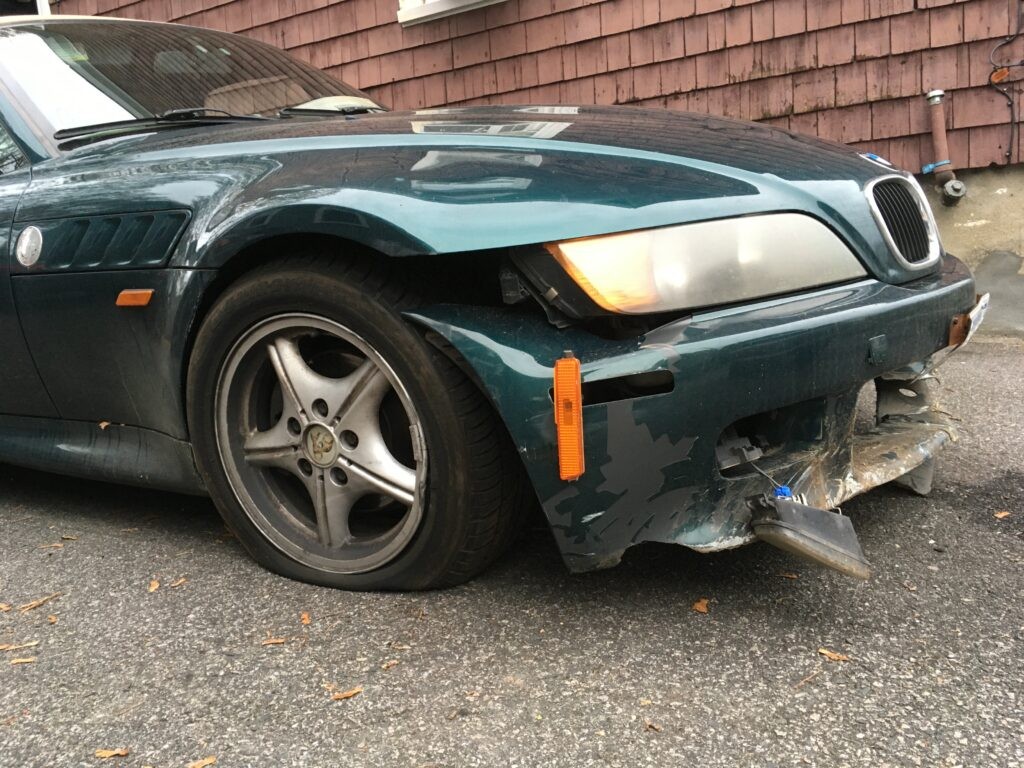
Zelda had been a source of joy for years until a late-night mishap resulted in a curb strike. While the structural damage was minimal, the front bumper cover was another story. It was cracked, held together with tape, and showed signs of previous repair attempts. The insurance company likely would have written the car off, but I couldn’t let Zelda become just another parts car. So, I bought her back and began the restoration, focusing on getting her back to her former glory, starting with that unsightly front bumper.
This almost spelled the end of Zelda.
The original bumper cover was beyond simple repair. Years of wear and tear, coupled with the recent impact, meant it was time for a replacement bumper part car owners often dread dealing with. While the damage bothered me, the thought of expensive repairs was even more unsettling. Like many DIY enthusiasts, I explored cost-effective options to restore Zelda’s front end without breaking the bank.
This probably bothers you more than it does me. I did want to set it right, but only at the right cost.
My first attempt at a budget solution was an aftermarket bumper cover from Amazon. The price was certainly appealing, but the quality was severely lacking. It arrived folded in a bag, flimsy and clearly not up to par. This reinforced the importance of quality when choosing a bumper part car owners rely on for both aesthetics and, to some extent, protection. It was promptly returned.
Not kidding about the bumper cover in a sack.
Next, a friend offered me a purple OEM bumper cover he had spare. Thinking I’d struck gold, I collected it, only to realize it was designed for a four-cylinder Z3, featuring a smaller grille opening than my six-cylinder model required. While a quirky color mismatch could have been embraced for a truly budget build, I wanted to maintain some respect for Zelda’s original appearance. This highlighted another crucial aspect of sourcing a bumper part car: ensuring compatibility with your specific vehicle model and trim.
The purple bumper cover in all its, uh, purplicity.
The ideal solution was to find a Boston Green bumper part car – specifically, a bumper cover in the correct color and for the six-cylinder Z3. Searching online marketplaces like Facebook Marketplace and Craigslist, I expanded my search radius and eventually found a promising listing near Springfield, Massachusetts. A seller was parting out a Boston Green Z3, and crucially, had the front bumper cover available.
The photos revealed some damage – splits on the lower section – but it was significantly better than Zelda’s current state. Plus, the seller also had the inner fender liners I needed. For a hundred dollars, including the fender liners, it was a deal worth pursuing. This Boston Green bumper part car was not perfect, but it was the right color, the right type, and crucially, within driving distance, saving on hefty shipping costs for such a bulky item.
Yes, it’s damaged, but it’s way better than the one on the car; it was the right color, it was cheap, and it was on an errand route.
The road trip to collect the Recaro office chair and the bumper part car proved fruitful. Loading the bumper cover into my E39’s fold-down rear seat was a testament to practical car design. With the replacement bumper secured, the project to restore Zelda’s front end could finally begin.
E39 fold-down rear seat for the win.
With a spell of unseasonably warm weather, I decided to tackle the bumper replacement in my driveway. While not strictly necessary, jacking up the car provides much better access to the bolts securing the bumper. Safety is paramount, so using jack stands on metal plates to prevent sinking into the asphalt, and leaving the jack as a backup, ensured a safe working environment.
Ready or not, here we go.
Numerous online resources, like the Pelican Parts website, offer step-by-step guides for removing a Z3 front bumper cover. Contrary to some videos, headlight removal isn’t necessary. On my car, with some undercarriage parts already missing, removing the two T-50 Torx bolts holding the bumper to the body was surprisingly straightforward. The entire bumper part car assembly – cover and underlying bumper – slid off easily.
Easy-peasy.
Upon flipping the old bumper cover, the term “bumper cover” became clear. The aluminum bumper itself is housed within the plastic cover, attached by sixteen plastic rivets. When sourcing a used bumper part car, it’s important to clarify whether it includes the inner bumper, fog lights, marker lights, and grille, or if these components need to be transferred from the old cover.
Removing the plastic rivets requires patience. Using a punch and hammer to partially push out the pins, followed by a prying tool to remove the rivet heads, is the recommended technique.
The actual aluminum bumper is nestled inside the cover.
Sixteen plastic rivets secure the cover to the bumper.
Here, the bumper has been separated from the cover.
The component transfer revealed further minor issues. Broken mounting tabs for the fog lights, a consequence of the original accident, needed attention. Zip ties had been a temporary fix, but proper repair was now needed. Similarly, securing the grille in the replacement bumper part car presented unexpected challenges.
This was the good fog light.
These minor setbacks, requiring epoxy and new fasteners, extended the project slightly as winter weather returned. However, the bulk of the bumper part car replacement was complete, and Zelda was one step closer to her therapy-car persona.
Yes, it is still winter.
With just a few finishing touches remaining, the DIY bumper replacement project was nearing completion, proving that sourcing the right bumper part car and taking a hands-on approach can be both rewarding and cost-effective. The satisfaction of seeing Zelda’s smile-inducing front end restored was well worth the effort.