As a devoted enthusiast of scale model cars, particularly Tamiya’s 1/12 series, I’m consistently impressed by the exceptional engineering and detailing incorporated into each part of these kits. It’s a true testament to Tamiya’s commitment to quality, which makes it all the more regrettable that they’ve discontinued this line. The intricate design and mold creation must indeed be a significant investment. For those seeking these gems, eBay often becomes the go-to treasure trove.
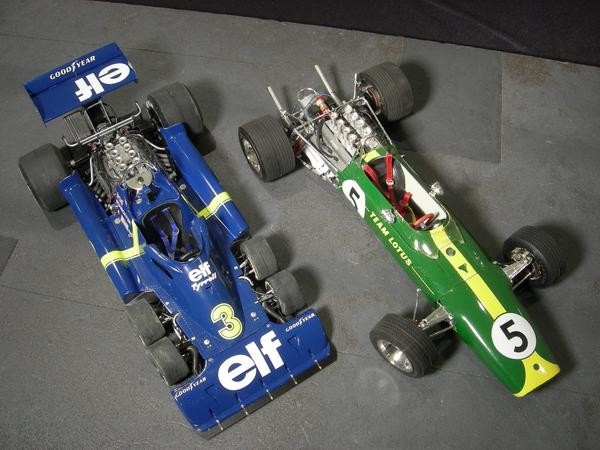
In recent times, I’ve completed a couple of 1/12 scale projects – a Lotus and an Elf six-wheeler. The Elf, in particular, proved to be quite the undertaking, pushing my modeling skills to their limits.
Currently, my workbench is occupied by the iconic Ferrari 312T. This kit, a product of 1975, boasts over 400 exquisitely detailed parts. The engine assembly alone is a miniature marvel, comprising nearly 200 individual components. The level of detail in these 1/12 Scale Model Car Detail Parts is truly remarkable, offering a deep dive into the mechanics and aesthetics of these legendary vehicles.
Securing this kit on eBay was a fortunate find. Upon opening the box, I was greeted by the sight of all parts still sealed in their original bags – a reassuring sign of its untouched condition.
However, delving into the instructions revealed a minor hurdle: they were printed entirely in Japanese! A quick online search for English instructions is definitely in order. This is a common challenge with vintage kits, but the online modeling community is usually a great resource for overcoming such obstacles when working with 1/12 scale model car detail parts.
Another age-related issue surfaced with the kit’s decals – the white areas had unfortunately yellowed over time. Sourcing a replacement decal sheet online will be necessary to restore the model to its pristine glory. Again, this is part of the restoration process when working with older 1/12 scale model car detail parts and ensuring an authentic finish.
This kit includes numerous frets of photo-etched parts, essential for achieving the fine details characteristic of 1/12 scale models. To streamline the building process, I’ve labeled each fret with masking tape and a marker. This simple step saves considerable time searching for the correct fret during assembly, especially when dealing with hundreds of 1/12 scale model car detail parts.
Now, let’s get to the build itself.
I’m commencing with the wheels and tires. The kit wheels are molded in grey plastic. The actual 1:1 Ferrari 312T sported three wheel variations: gold rims and spokes, chrome-plated rims with gold spokes, and polished aluminum rims with gold spokes. I’m opting for the polished rims and gold spokes combination, aiming for a classic and refined look that highlights the 1/12 scale model car detail parts.
The tires included in the kit are remarkably well-made. They are crafted from soft vinyl and feature embossed “Goodyear” lettering. However, their out-of-the-box shine is a bit too pronounced for scale accuracy. Real racing tires typically have a more matte finish.
To address the tire’s sheen and impart a more realistic, slightly used appearance, I’ll be using Aqualine brown mud wash. This acrylic wash is reactivatable with water, offering flexibility during application and cleanup. This technique is crucial for enhancing the realism of 1/12 scale model car detail parts like tires.
The weathering process begins by dampening my brush with water, then loading it with the mud wash. I carefully applied the wash to the tire tread and sidewalls, then used a paper towel to gently remove the excess. The reactivatable nature of this wash is a great advantage, allowing for adjustments even after it dries. It’s important to note that the behavior of other washes may differ, so caution is advised when experimenting with weathering techniques on 1/12 scale model car detail parts.
For the wheel rims, I used Testors’ Model Master Metallizer Aluminum Plate paint, followed by polishing with a paper stump to achieve a realistic sheen. The spokes were then painted with Testors’ gold paint. Notice the now subtly dirtied sidewalls of the tire, a result of the mud wash application, adding depth and realism to these 1/12 scale model car detail parts.
To further enhance realism, I added tire pressure valves, markings for left and right sides, and wheel weights. For the wheel weights, I used small pieces of plastic adhered to the rim and covered them with Bare Metal Foil to simulate duct tape. Duct tape is commonly used on 1:1 race cars to secure wheel weights, a small but significant detail that elevates the accuracy of these 1/12 scale model car detail parts.