Maintaining your vehicle’s peak performance requires a thorough understanding of its engine components. Among these, the carburetor plays a crucial role in older vehicles, responsible for mixing air and fuel for optimal combustion. Regular maintenance and understanding the function of each part are essential for any car owner, especially those dealing with classic cars or vehicles not equipped with modern fuel injection systems. This article will delve into the essential Car Carburetor Parts Names, their functions, and how they contribute to your engine’s operation.
Carburetor Components and Their Functions
A carburetor is not a single, monolithic piece, but rather a carefully engineered assembly of various parts working in harmony. Each component has a specific role to play in the precise metering and delivery of the air-fuel mixture to your engine. Let’s explore the key car carburetor parts names and their functions:
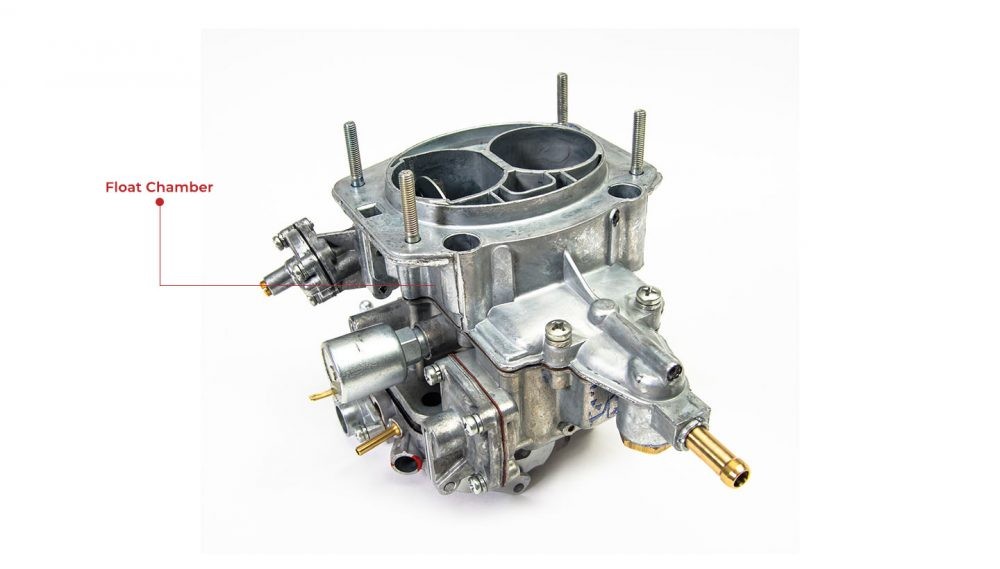
1. Float Chamber
The float chamber, sometimes referred to as the float bowl, is the reservoir of fuel within the carburetor. It maintains a consistent fuel level, crucial for ensuring a stable fuel supply to the jets. Inside the float chamber, you’ll find the float itself. The float chamber’s design is critical for consistent engine performance under varying driving conditions.
2. Floater
The floater, or float, is a small, buoyant component typically made of plastic or brass. Its primary function is to regulate the fuel level within the float chamber. As fuel enters the chamber, the float rises. When the fuel reaches a predetermined level, the float, through a needle valve mechanism, shuts off the fuel supply, preventing overflow. This ensures a constant fuel head for consistent mixture preparation. A malfunctioning floater can lead to fuel starvation or flooding, both detrimental to engine performance.
3. Choke Valve
The choke valve is a butterfly valve located at the air inlet of the carburetor. Its function is primarily for cold starts. When the engine is cold, fuel vaporization is less efficient. Engaging the choke valve restricts airflow into the carburetor, creating a richer fuel-air mixture. This richer mixture is easier to ignite in cold conditions, aiding in starting the engine. Once the engine warms up, the choke valve should be gradually opened to restore the optimal air-fuel ratio for efficient running. An improperly adjusted choke can lead to poor fuel economy and emissions.
4. Throttle Valve
The throttle valve, another butterfly valve, is positioned downstream of the venturi and controls the amount of air-fuel mixture entering the engine’s intake manifold. It is directly linked to the accelerator pedal. When you press the accelerator, you are essentially opening the throttle valve, allowing more mixture into the engine, increasing engine speed and power. The throttle valve is a key component in regulating engine output and responsiveness.
5. Main Jet
The main jet is a calibrated orifice that meters the primary fuel flow at mid to high throttle openings. It is a critical car carburetor part for controlling the air-fuel ratio during normal driving conditions. The size of the main jet is precisely engineered to deliver the correct amount of fuel for optimal performance and fuel efficiency at cruising speeds and under load. Changing the main jet size is a common practice for tuning carburetors for different altitudes or performance modifications.
6. Jet Needle
The jet needle is a tapered needle that works in conjunction with the main jet to fine-tune the fuel delivery in the mid-range throttle positions. It is positioned inside the needle jet, and its tapered profile progressively uncovers the jet as the throttle opens, allowing for a variable fuel flow rate. The jet needle’s position and taper are crucial for smooth transitions between idle and full throttle, and for optimizing fuel mixture across the mid-range engine speeds.
7. Slow Jet
The slow jet, also known as the idle jet or pilot jet, is responsible for supplying fuel when the engine is idling or at very low throttle openings. It’s a smaller jet than the main jet and ensures the engine receives enough fuel to keep running smoothly when the throttle valve is mostly closed. The slow jet is critical for idle quality and smooth off-idle transitions.
8. Piston Valve Screw and Pilot Screw
The piston valve screw and pilot screw are adjustment screws that fine-tune the idle mixture and idle speed. The pilot screw, often referred to as the mixture screw, controls the air-fuel ratio at idle. Adjusting it changes the amount of air or fuel supplied by the slow jet circuit. The piston valve screw, or idle speed screw, physically adjusts the position of the throttle valve at idle, setting the minimum airflow and thus the idle speed of the engine. These screws are essential for achieving a smooth and stable idle.
9. Main Nozzle
The main nozzle, or atomizing nozzle, is the point where fuel is discharged into the venturi. It’s designed to efficiently atomize the fuel as it enters the airstream. The main nozzle is positioned in the narrowest part of the venturi to maximize the air velocity and ensure proper fuel vaporization and mixing. Its design directly impacts the quality of the air-fuel mixture and the engine’s combustion efficiency.
10. Venturi
The venturi is a constricted section within the carburetor’s throat. Its shape is based on Bernoulli’s principle. As air flows through the venturi, its speed increases, and its pressure decreases. This lower pressure at the venturi draws fuel from the main nozzle and slow jet circuits, effectively mixing fuel and air. The venturi is fundamental to the carburetor’s operation, creating the pressure differential needed to draw fuel into the airstream. Different carburetor designs may utilize single, dual, or even multiple venturis for varying engine performance characteristics.
Carburetor Function: Mixing Air and Fuel for Combustion
The primary carburetor function is to precisely mix air and fuel in the correct proportions to create a combustible mixture for the engine. This mixture needs to be adjusted based on engine speed, load, and temperature for optimal combustion, fuel efficiency, and emissions. The carburetor achieves this through the coordinated operation of all the components described above. It atomizes fuel into fine droplets and mixes it thoroughly with air before delivering it to the engine’s cylinders.
How a Car Carburetor Works: Utilizing Bernoulli’s Principle
How a car carburetor works relies on a fundamental physics principle: Bernoulli’s principle. As the engine’s pistons move downwards on the intake stroke, they create a vacuum. This vacuum draws air through the carburetor. The air is forced to pass through the venturi, a narrowing in the carburetor’s passage. As air passes through the venturi, its velocity increases, and pressure decreases. This low-pressure area in the venturi draws fuel from the float chamber, through the jets and nozzles, into the airstream. The atomized fuel mixes with the air, creating the air-fuel mixture that is then drawn into the engine’s cylinders for combustion. The amount of mixture is controlled by the throttle valve, which is manipulated by the driver’s accelerator pedal.
Carburetor Care Steps: Maintaining Optimal Performance
To ensure your carburetor functions correctly and your engine runs smoothly, regular maintenance is crucial. Here are key carburetor care steps:
1. Clean Filter
Start by cleaning the air filter. A dirty air filter restricts airflow to the carburetor, leading to a richer mixture and reduced engine performance. Remove the air filter and clean it using compressed air. For foam filters, wash them with mild soap and water, ensuring they are completely dry before reinstallation. Regular air filter cleaning is a simple yet effective way to maintain carburetor efficiency.
2. Remove The Carburetor Components
For a more thorough cleaning, carefully disassemble the carburetor. Before starting, ensure the engine is cool and disconnect the fuel line. Loosen and remove the bolts securing the carburetor components, taking care to use the correct tools to avoid damage. Carefully remove components like the float bowl, jets, and needle. Keep small parts organized to facilitate reassembly.
3. Clean All Parts of the Carburetor
Once disassembled, clean all car carburetor parts thoroughly. Use carburetor cleaner spray to dissolve deposits and varnish. For jets and small passages, use compressed air to blow out any blockages. A soft brush can be used to gently scrub away stubborn dirt. Pay particular attention to the jets, ensuring they are clear of any obstructions. For pilot jets, use extreme caution with fine sandpaper as altering their size can drastically affect idle mixture.
4. Reassemble
After cleaning and drying all parts, carefully reassemble the carburetor. Refer to a repair manual or online resources if needed to ensure correct placement of each component. Tighten all bolts and screws securely, but avoid over-tightening. Once reassembled and reinstalled on the engine, reconnect the fuel line and start the engine. Adjust the idle mixture and idle speed screws to achieve a smooth and stable idle, following the manufacturer’s specifications if available.
By understanding the car carburetor parts names, their functions, and implementing regular maintenance, you can ensure your vehicle’s carburetor operates efficiently, providing reliable performance and extending its lifespan. For classic car enthusiasts and owners of older vehicles, carburetor knowledge is not just helpful, it’s essential for keeping these machines running smoothly for years to come.