Many car enthusiasts face the challenge of mismatched or faded plastic components that detract from their vehicle’s overall aesthetic. Often, these parts, like sun visor clips or interior trim, are not available in the desired black color, or have faded from their original deep black hue. Painting these parts might seem like a quick fix, but it often leads to chipping and scratching, especially in high-use areas. This article explores a more durable and permanent solution: dyeing plastic car parts black. We’ll delve into a step-by-step guide to achieve a factory-finish black that penetrates the plastic, ensuring long-lasting results for your Black Car Parts.
The Pitfalls of Painting Black Car Parts
While spray paint offers a seemingly easy way to change the color of plastic car parts to black, its limitations become apparent with time and use. Paint sits on the surface, making it vulnerable to scratches and chips, particularly in areas subject to friction or frequent contact. For components like sun visor clips, constantly being moved and adjusted, painted surfaces quickly show wear and tear, revealing the original color underneath and diminishing the desired black aesthetic.
Image: Original white sun visor clips prepped for a paint job, highlighting the contrast against a black interior and the challenge of achieving a durable black finish with paint.
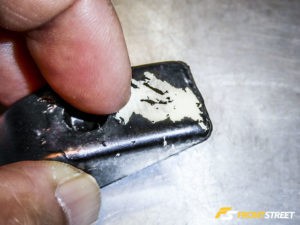
In an initial attempt to address this issue, spray paint specifically designed for plastic was applied to sun visor clips. Despite careful preparation with cleaners and plastic adhesion promoters, the painted surface proved to be easily scratched. This experiment highlighted the need for a color change method that goes beyond surface coating for black car parts.
Why Dyeing Offers a Superior Solution for Black Car Parts
Dyeing plastic offers a significant advantage over painting when aiming for a permanent black finish on car parts. Unlike paint, dye penetrates the plastic material itself, creating a color change that is embedded within the component. This means that even if the surface is scratched, the black color remains, maintaining a consistent and factory-like appearance.
Rit dye, commonly used for fabrics, is also effective for dyeing plastics, especially black Rit dye. Its popularity in hobbyist communities stems from its ability to deeply saturate plastic, making it nearly indistinguishable from factory-colored black plastic car parts. This penetration is key to achieving a durable and long-lasting black finish that resists wear and tear.
Image: Assortment of Rit Dye products, showcasing the variety of colors available for customizing plastic car parts and the potential for achieving a deep black hue.
Experimenting with Standard Rit Dye for Black Car Parts: A Detailed Process
The journey to permanently blackening plastic car parts began with an experiment using standard Rit dye. This method, while not ultimately achieving jet black in this specific case, provides valuable insights into the dyeing process and is a crucial step in understanding the nuances of plastic dyeing for black car parts.
Step-by-Step Guide to Dyeing with Rit Dye:
- Preparation: Thoroughly clean the plastic parts to remove any dirt, grime, or oils that could interfere with dye absorption.
- Dye Bath Preparation: Fill a pot with water and bring it to a near boil, aiming for a temperature between 170 to 200 degrees Fahrenheit. Use a thermometer to ensure accuracy. Note: Use a pot that you don’t mind potentially staining.
Image: Using a thermal gun to measure the water temperature, emphasizing the importance of heat control in the plastic dyeing process for optimal black color absorption.
- Adding Dye Enhancers: Introduce salt, white vinegar, and dish detergent to the boiling water.
- Salt: Helps to raise the boiling point of water, theoretically accelerating the dye adhesion.
- White Vinegar (Acetic Acid): Aids in dye penetration into the plastic.
- Dish Detergent: Acts as a depolarizing agent, helping the dye mix more effectively with water.
Image: Pouring salt into the boiling water, illustrating the step of enhancing the dye bath solution to improve the black dyeing process for car parts.
Image: Adding white vinegar to the hot water and salt mixture, showing the incorporation of acetic acid to aid in dye penetration for achieving deep black car parts.
Image: Incorporating dish detergent into the dyeing solution, demonstrating the use of a depolarizing agent to improve dye mixing and effectiveness for black plastic car components.
- Adding Rit Dye: Pour in the Rit liquid dye (black in this case) and stir thoroughly to ensure even distribution.
Image: Mixing Rit liquid dye into the prepared hot water solution, highlighting the step of creating the dye bath for transforming plastic car parts to black.
- Dyeing Process: Submerge the plastic parts completely into the boiling dye bath. Maintain a rolling boil and agitate the parts periodically for even dyeing. Check the color progress every 15 minutes, with a typical dyeing time of 15-60 minutes.
Image: Submerging the white plastic car parts into the boiling black dye solution, initiating the process of transforming them to black through dye infusion.
Image: Inspecting the plastic parts during the dyeing process, demonstrating the need for regular checks to achieve the desired depth of black color for car components.
- Rinsing and Cooling: Once the desired shade is achieved, remove the parts and rinse them in distilled water to seal the surface and remove excess dye.
Image: Rinsing the dyed plastic part in distilled water after boiling, crucial for setting the black dye and removing any residue to ensure a clean finish.
Outcome of the Rit Dye Experiment: While the parts did absorb some dye, the resulting color was a dark purple hue rather than a jet black. This indicated that the standard Rit dye formula was not fully compatible with the specific type of plastic used in the sun visor clips to achieve a true black for these car parts.
Image: The plastic part after dyeing with standard Rit Dye, showing a dark purple tint instead of the intended jet black, highlighting the limitations of standard dye for certain plastics in achieving true black car parts.
Achieving a Jet Black Finish: Rit DyeMore and Acetone Method for Black Car Parts
To overcome the limitations encountered with standard Rit dye, a more specialized approach using Rit DyeMore for Synthetics and acetone was employed. Rit DyeMore is formulated for synthetic fabrics and plastics, containing disperse dyes that are more effective on materials like polyester, nylon, and acrylic. Acetone acts as an activator, aiding dye penetration into tougher plastics to achieve a deeper, truer black for car parts.
Experimenting with Rit DyeMore and Acetone:
- Preparation: As before, ensure the plastic parts are clean and free of contaminants. Work in a well-ventilated area due to acetone fumes.
Image: Rit DyeMore product, specifically designed for synthetic materials, indicating its suitability for dyeing various types of plastic car parts to black.
- Dye Bath with Acetone: Heat water to 200 degrees Fahrenheit. Important Safety Note: Never add acetone to hot water directly as it can cause dangerous splashing due to acetone’s lower boiling point. Mix Rit DyeMore with a small amount of water separately before adding it to the hot water bath. Carefully add a small percentage of acetone to the dye bath. Start with a low concentration (around 5%) and increase gradually if needed.
Image: Preparing the dye bath with Rit DyeMore and acetone in a well-ventilated area, emphasizing safety precautions when using acetone for dyeing black car parts.
Image: Carefully mixing acetone into the dye solution, highlighting the cautious approach needed when combining acetone with hot dye for effective and safe black plastic dyeing.
- Dyeing Process: Submerge the plastic parts in the DyeMore and acetone bath. Agitate gently and monitor the color change frequently. Acetone facilitates faster dye penetration, so dyeing time may be shorter than with standard Rit dye.
Image: Submerging the plastic car parts into the Rit DyeMore and acetone solution, initiating a more aggressive dyeing process to achieve a deep black color.
- Final Rinse and Inspection: Once the desired jet black color is achieved, remove the parts and rinse thoroughly with distilled water. Inspect the parts for even color and a deep black finish.
Success! The Rit DyeMore and acetone method successfully dyed the plastic sun visor clips to a rich, jet black. The color penetrated deeply, resulting in a finish that looks factory-made and is resistant to scratching and wear.
Image: Newly dyed black sun visor clips fresh from the Rit DyeMore and acetone mixture, showcasing the successful transformation to a deep, uniform black.
Image: Close-up view of the finished black plastic car parts, emphasizing the factory-like quality and consistent black color achieved through the dyeing process.
Conclusion: Permanent Black Car Parts Through Dyeing
Dyeing plastic car parts, particularly with Rit DyeMore and acetone for synthetic plastics, offers a superior and permanent solution compared to painting. This method ensures a deep, scratch-resistant black finish that enhances the look and longevity of your car’s interior and exterior trim. While standard Rit dye may work for some plastics, for achieving a true jet black on various car parts, the Rit DyeMore and acetone technique proves highly effective. For car enthusiasts seeking a durable and factory-quality black finish for their plastic components, dyeing is the recommended approach.