Borderlands 3 offers extensive vehicle customization, and a key way to obtain unique upgrades is by finding Hijack Targets scattered throughout the game. These challenges not only reward you with valuable vehicle parts but also contribute to your Crew Challenge completion, essential for true Borderlands 3 completionists. This guide will pinpoint all Hijack Target locations, ensuring you can collect all car parts in Borderlands 3 and maximize your ride’s potential.
Acquiring vehicle parts from Hijack Targets provides fixed and unique upgrades, differentiating them from random parts obtained by hijacking ordinary vehicles. These fixed parts can significantly enhance your vehicles, offering improvements to bodywork, paint jobs, driver weapons, armor, wheels, and mods. Once you’ve successfully hijacked a target vehicle and returned it to a Catch-a-Ride station, these new customization options become available. At any Catch-a-Ride, you can then personalize your Outrunner, Technical, or Cyclone with your newly acquired parts.
No Hijack Targets are missable, allowing you to pursue them even after completing the main story. To track your progress, check the map icons – green icons indicate未collected targets, while faint blue signifies completed ones. Alternatively, access the world map, press L3/Left Stick, and navigate to “Challenges” using D-Pad Right.
Hijack Targets appear on your map as you approach their locations. Access to certain areas may require story progression. Rest assured, all locations mentioned in this guide are visited during the main storyline.
While Hijack Targets provide 10 unique vehicle parts, remember that many more parts can be randomly obtained from vehicles throughout Borderlands 3’s diverse planets. Hijacking these random vehicles and delivering them to a Catch-a-Ride station will expand your collection of all car parts in Borderlands 3, ensuring your vehicles are always combat-ready and stylish.
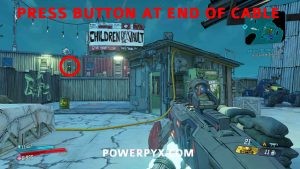
#1 – Outrunner’s Heavy Armor
Location: Pandora, Ascension Bluff
To access this Hijack Target and claim the Outrunner’s Heavy Armor, you’ll need to activate a power switch. Locate the yellow cable and follow it to its end, where you’ll find a button. Hitting this button will power up the system and open the nearby door, granting you access to the vehicle.
#2 – Technical’s Spike Wheels
Location: Pandora, Devil’s Razor
Devil’s Razor becomes accessible during your second visit to Pandora, specifically during the “Blood Drive” main mission. The Technical with Spike Wheels is located on a rooftop in this area. To reach it, climb the side of the building as pictured, gain entry to the rooftop, and then drive the Technical off the edge to successfully hijack it.
#3 – Outrunner’s Zip Wheels
Location: Pandora, Devil’s Razor
Another Hijack Target awaits in Devil’s Razor, this time offering the Outrunner’s Zip Wheels. To reach this vehicle, look for a scaffold structure with yellow ledges situated beneath the vehicle. Climb this scaffold to access the vehicle and drive it off the adjacent ramp.
#4 – Technical’s Tire Launcher
Location: Pandora, The Splinterlands
In the Homestead area of The Splinterlands, you can find the Technical’s Tire Launcher Hijack Target. Similar to another target, you need to activate a button connected by a yellow electricity cable. Climb the building where the Technical is parked. The button is located at the top of this building, which will open the garage door below, revealing the vehicle.
#5 – Technical Sticky Mines
Location: Promethea, Meridian Outskirts
The Hijack Target for Technical Sticky Mines in Meridian Outskirts can be initially tricky to spot on the map until you are very close. Once nearby, it’s easily accessible. Simply use the yellow ledges on the side of the structure to climb up to the vehicle’s location.
#6 – Cyclone’s Sonic Booster
Location: Promethea, Meridian Metroplex
The Cyclone’s Sonic Booster in Meridian Metroplex is protected by a yellow energy barrier. Deactivating this barrier requires manipulating a nearby power cable. Follow the yellow power cable from the barrier and shoot the three red targets positioned above it on the pipes. This action will cause water to flow and electrify sections of the cable. After shooting all three targets, interact with the power button located at the energy barrier to disable it and access the vehicle.
#7 – Outrunner’s Razor Wings
Location: Eden-6, Floodmoor Basin
The Outrunner’s Razor Wings in Floodmoor Basin presents a more challenging Hijack Target. Reaching this vehicle requires a jump from the cliffs above it, specifically from the cliffs near Knotty Peak. Climbing directly to the vehicle is not possible. Utilize a vehicle, ideally the Cyclone, and use its boost to make a long jump from the cliff ramp onto the platform where the Hijack Target is located. Precision is key to avoid crashing and potentially destroying the vehicle.
#8 – Cyclone’s Wide Wheel
Location: Eden-6, Floodmoor Basin
Another Hijack Target in Floodmoor Basin offers the Cyclone’s Wide Wheel. To reach it, navigate around the corner of the building where the vehicle is situated. This will lead you to a “balcony” area where the Cyclone is parked, allowing you to easily drive it away.
#9 – Cyclone’s Digithruster
Location: Nekrotafeyo, Desolation’s Edge
The Cyclone’s Digithruster in Desolation’s Edge is one of the simplest Hijack Targets to acquire. The vehicle is housed in a garage blocked by red vines. Simply use a melee attack to destroy these vines, clearing the entrance and granting access to the vehicle.
#10 – Outrunner’s Energy Cell
Location: Nekrotafeyo, Desolation’s Edge
The final Hijack Target, Outrunner’s Energy Cell, is also located in Desolation’s Edge and protected by a yellow energy barrier. To disable this barrier, you need to locate and destroy three generators connected to it via yellow power cables. Follow each of the three yellow cables to find its corresponding generator and shoot it. Destroying all three generators will deactivate the energy barrier, allowing you to claim the Outrunner’s Energy Cell.
By following this guide, you can successfully locate and hijack all 10 Hijack Targets in Borderlands 3. Collecting these vehicles will unlock unique car parts and significantly enhance your vehicle customization options, ensuring you have the best rides in the Borderlands. Remember to explore and hijack random vehicles as well to truly collect all car parts in Borderlands 3 and become the ultimate vehicle master.